Pages

Saturday, March 30, 2013

Greatma (my mother) has finally been moved out of the nursing unit at her residence and into assisted living, into the dementia unit. She is no longer able to make her traditional bunnies for Easter. We weren't even sure she would remember them. So yesterday, I took several dozen cupcakes with both Greatma's bunnies and Peeps toppers to the nursing staff, to thank them for all they have done for my mom. And would you believe, Mom recognized the marshmallow bunnies and got so excited that someone remembered her Easter treat....

And the tradition lives on....

This is a post I wrote a couple of years ago...on our family tradition of making marshmallow Easter Bunnies...
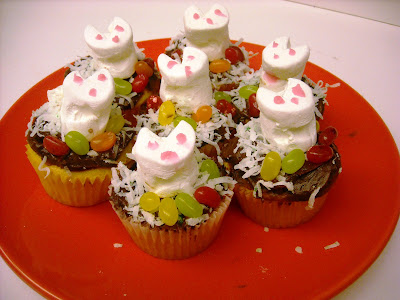
Easter and Easter bunnies always bring to mind my momma's Easter cake...and cupcakes. Beginning the week before Easter, Momma would start the process of making these darling creatures...then she would make cupcakes until they were covering every flat surface in our kitchen. These were the special treats she would give to all the kids in the neighborhood...to friends...to our classmates...and when I became a teacher, she even made them for the children in my classroom. The cake, itself, was just a "box cake" (usually yellow), the frosting was always homemade, but the decorations were so very special. Momma never relied on store-bought Peeps (my absolute favorite Easter treat) for her bunnies, she made them herself, using a single large marshmallow, some frosting, and a tiny bit of pink crepe paper. We kids always made a contest out of who could eat the bunny without removing the pink paper. (She finally began decorating the ears with pink frosting...to keep us from eating the crepe paper!)


To make Greatma's Bunnies:


1 large marshmallow
scissors (Dip your scissors in water before each cut...no sticking!)
pink frosting
pink crepe paper (i don't use this anymore - too much trouble to remove before eating!)


Cut the marshmallow about 1/3 down from the top. DO NOT CUT ALL THE WAY THROUGH!!!


Fold the cut edge until it stands up. This makes the face/head.


Where the marshmallow bends, either make a tiny cut or pinch a tiny gash and press the "face"onto the raw, sticky gash. The head is now standing up a bit.


With the scissors, cut a V into the top of the face...just a short way down. This makes the ears.


Use the little cut piece to make the tail...press it onto the "butt".


Make little pink eyes and nose with the frosting. (Put a little frosting on the backs of the ears if desired.)


Frost a cupcake with Chocolate frosting (it's the dirt)...or any flavor you wish. Place the "bunny" into the frosting. Sprinkle a little coconut (tinted a light green)* around the bunny. Press a few jelly beans (eggs) into the soft frosting. Let stand for a little while so the bunny and eggs have a chance to stick. Enjoy!


Momma's memories are fleeting...she's suffering from Dementia. Perhaps she will remember these little bunnies...and the fun we had making them each year.

Wishing all of you a Blessed Easter.
Jane

* This year, I found edible Easter grass. It was a wonderful alternative to the green-dyed coconut.


Saturday, March 16, 2013

TIME KEEPS ON SLIPPING....

I can't believe it! 
I COMPLETELY MISSED FEBRUARY!   And I broke my New Year's resolution
...writing at least 2 times a month. Here it is...March 16 and this is the first time I have even checked with my blog friends. My apologies...I really do care. It's just been difficult to write...

But I am still JOYFUL....even with the craziness around me. In fact, my joy increases abundantly, each time I think about my blessings...and there are MANY!

Update:

Mediation came and went. A waste of time. No resolution. 

Rowdy (my constant companion) passed away...very peaceful about this, but I really miss him!


Readied Mom's new apartment...closed the old one. Moving day was set for Tuesday.
                                                                                           
Learned on Friday that Mom cannot be moved from the nursing care facility to the "Harmony Care" unit for another week or so. She needs more intensive training on safety issues....which she promptly forgets.(This has been up and down so many times. We're all frustrated and she is so unhappy. At least she doesn't remember that she was moving...even though we have visited her new place multiple times. All I can say is getting old stinks!) 


Traveled with Marty for a week! (That was fun!) We just went to Orlando and to Jax...and took a side trip to my beloved St Augustine. (Had a great lunch at South Beach Grill...one of our favorite beachside restaurants) A good time of relaxation, shopping, and catching up with an old friend...Plus extra time with our middle son! (These guys must be "yankees"...it was freezing! Temps were in the mid-50s. That's COLD in Florida!)

Making decisions where we would like to live...just in case...near our kids? St Augustine? a condo? another house?

But the biggest news:


Miss Evelyn is ONE!

All in all, life it good!

Oh yes...I am painting again!!! And it makes me very happy!

Jane

Friday, February 1, 2013

WHEW! Thank goodness January is....

In the past month...

Car breaks down...
Mom falls...dislocates her shoulder and whacks her head.
Mom's dementia accelerates...
Car breaks down...again.
Washing machine's sensor malfunctions...house floods. All the
 floors are warping and need to be replaced.
Car breaks down...again! (Why can't they find the source of
 the problem???)
AC is down...again. (Hey, it's 80+ degrees here! And it's pollen season until the end of March!)
Dishwasher breaks...
Front door has issues...
Rowdy, my dog and constant companion for 11 years, has
 been diagnosed with lesion(s) on his brain... 
Mediation for our home is in 2 weeks...(after a 5 year battle
 with the bank)

All these things are DISTRACTIONS!

They distract me from the really important stuff...

They have inhibited my creative spirit...


Yes, occasionally, I feel sorry for myself...occasionally, I dwell on the bad stuff (and there's a lot more, I could list)...but then, I am reminded of the wonderful family I have...my loving husband...three well-grounded sons...sweet daughters-in-law...a beautiful granddaughter...a strong marriage...a man who joyfully supports me in all my eccentricities...my health...the fact that we have a job and can once again pay all our bills (and good prospects for rebuilding our reserves and retirement funds)...a home (for now and good prospects for keeping it)...wonderful friends...and so many more blessings...

Yes...I am filled with JOY!

All the troubling things...the distractions...are temporal. They will resolve themselves in a short while. As an old friend once pointed out...our trials are but a dot on the timeline of eternity. I am being prepared...molded...formed into the woman I am meant to be...

The important thing is...how I deal with distractions. Do I get so caught up in them that I am dwelling on the negative? Do I rant and rail?

This morning, I read a wonderful article in my daily devotional. It was talking about "cussing thoughts". In the article, three questions were given for us to ask ourselves...


  • Is this thought in line with truth?
  • Is this thought in line with who I am?
  • Is this thought in line with who I want to be?

*Women of Faith/ Lysa TerKeurst  (BTW It's a great article!)
http://us-mg6.mail.yahoo.com/neo/launch?.rand=ehtl53p4vl3ob#mail

These are really good questions...and they are definitely helpful, especially when dealing with the distractions in your life. Do I want to rail at all the "distractions"? Yes!  But then, is this the woman I want to be? Bitter...complaining...unhappy with life? NO!

I CHOOSE JOY!

Consider it all joy, my brethren, when you encounter various trials, knowing that the testing of your faith produces endurance. And let endurance have its perfect result, so that 
you may be perfect and complete, lacking in nothing. James 1:2-4


I am a work in progress...


Wednesday, January 9, 2013

A JOY-FILLED NEW YEAR!!!

This is what I wish for each and every one of you...a "JOY-FILLED" New Year.

As I thought about it (after the idea was put in my head, by a friend), I began seeing "Happy" New Year as lacking. Yes, we all want happiness in our lives....but the original 14th century meaning of the word "happy" meant lucky, favored by fortune, prosperous. From HAP...meaning chance or fortune. In the 1500s, the meaning changed a bit... to great wealth AND silly. (source: Online Etymology Dictionary)

As words were translated from Greek or Latin, a majority of the European words for "happy" were first translated to mean LUCKY (Lucky Charms?).  

The Welsh, however, translated it to mean WISE.

During World War ll, "happy" was attached to other words... such as "bomb-happy" which was to mean "dazed or frazzled from stress".

There is a lot more to this...and you can read the ETYMOLOGY DICTIONARY for more info (if you are a Geek like me).

So after reading all this, I decided that I wanted a year filled with JOY!

The origins of the word JOY come from "feelings of pleasure and delight", "source of pleasure or happiness", "to rejoice".

So this year...2013...I want to REJOICE! 

OK...enough of the etymology lesson...and it's time for a question...

What brings you JOY???

Here is one thing that brings me lots of joy...
My granddaughter and her daddy.
 and another...
My wonderful husband.

and another...
My three sons.

But most of all....THIS...

The knowledge that God is in control...the He will guide me and lift me and love me...come what may.

May you have a JOY-FILLED New Year!!!

Jane


Wednesday, December 19, 2012

LIFE at WARP SPEED...but there is a RECIPE!

Recently, I have not been blogging...as many of you may have noticed. I have missed all of you...and I am so sorry I have been a neglectful friend.

With the changes to Blogger, I have been confused with how to set things up. (I never said I was computer savvy!). And I get frustrated and give up posting anything...and reading your blogs. Shame on me!


I've also had a huge increase in the number of cooking classes. THAT'S GOOD, but very time-consuming. (I could make it easier on myself and do the same foods each time, but that would be boring!!!)

And then, there is the grandbaby...Miss Evelyn. She's the light of our lives. (Mac Daddy and I LOVE being grandparents!) We're fortunate to have Eva and her parents nearby...which means we get to play with her fairly often! And that's so much more important than blogging!

There just doesn't seem to be enough time in each day to do everything I want to do... I haven't even painted in months!!!

So here's my plan...

I am going to enjoy the holidays with my family and friends. (I've already hosted 2 parties in 2 weeks! And this week, there's a neighborhood cookie exchange, an engagement party and a family reunion...for which I am making all the desserts!)

Beginning in the new year...I am going to organize my office so I can actually find what I am looking for...set aside office hours - and stick to them! Set aside painting time - and actually PAINT! (I have 3 commissions to complete in January) And blog at least 2 times each month. 

There...I said it! Now I have to do it. It's kind of like the rule of a road trip..."Once declared, it cannot be rescinded"...or so MacDaddy says.


In the meantime...here's a delicious appetizer you might enjoy...

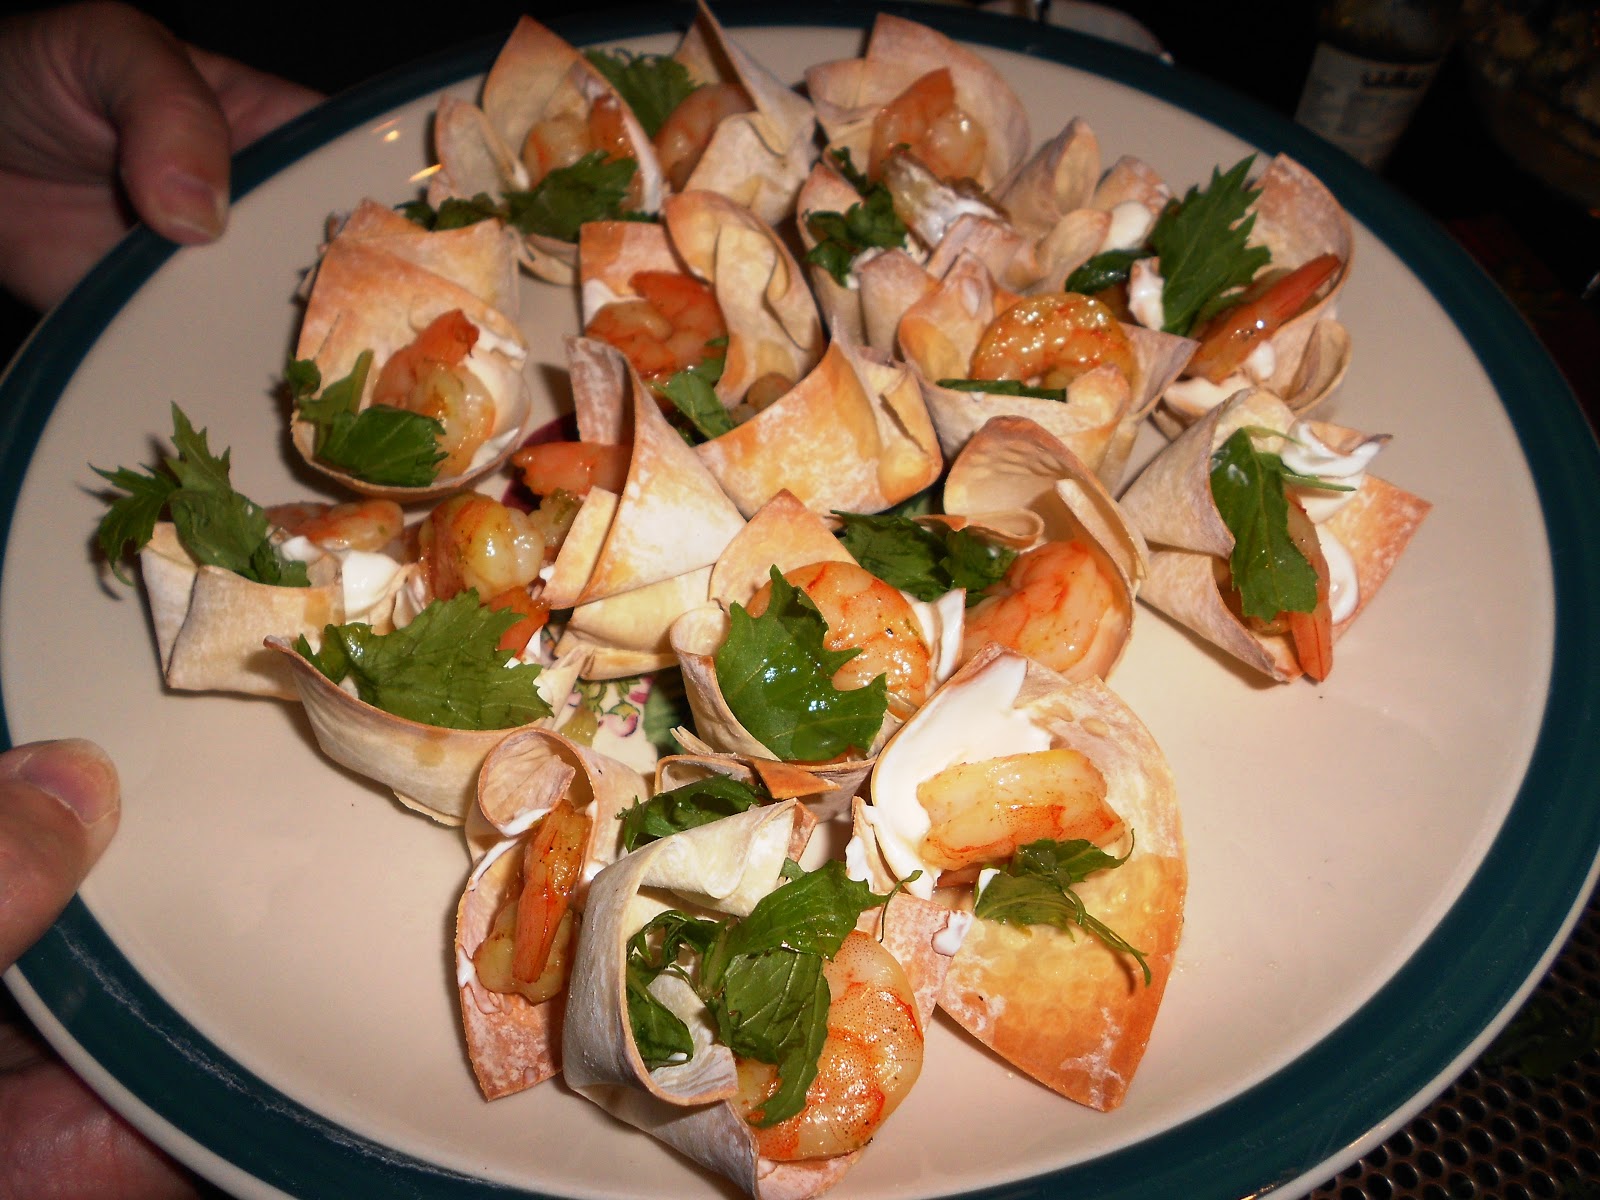
Chili Lime Shrimp Cups


These mini cups are perfect to serve at a party and are great warm or cold. You can make the wonton shells a day in advance; just keep at room temperature in an airtight container.
Ingredients
·         24 wonton wrappers
·         2 tablespoons olive oil
·         24 medium shrimp, peeled and deveined
·         1/2 teaspoon salt
·         1 teaspoon chili powder (I used ground red pepper)
·         2 limes
·         1/2 cup cilantro (or arugula)
·         3 tablespoons sour cream
Method
1.                   Preheat oven to 350 degrees F.
2.                   Place the mini muffin Flexipan on a perforated baking tray. Prepare wonton shells. Lightly brush wontons with 1 tablespoon of olive oil. Arrange (push into the pan, to form a cup. You do not need to cut these wontons…) in a mini muffin Flexipan. Bake 5-7 minutes until golden brown and crisp.
Toss shrimp with 1 tablespoon of olive oil, salt (sprinkle some over the shrimp), 2 teaspoons of lime zest (grated lime peel) and chili powder. Bake 5-8 minutes until shrimp are opaque throughout. (SILPAT and Perforated Tray)

To assemble, fill each wonton cup with a few leaves of cilantro, a small dollop of sour cream, one shrimp then top with a spritz of lime juice. 
(THIS MEANS JUST A TINY BIT OF JUICE SQUEEZED OVER THE TOP OF THE SHRIMP)

***I marinated the shrimp in the olive oil, lime zest, salt and red pepper for a couple of hours before I baked them. It saved time…with the final preparation.


Enjoy...and have a wonderful Christmas!!!
Jane

Friday, November 2, 2012

GARLIC CHICKEN, MUSHROOMS AND SPINACH on PASTA


Poor MacDaddy.... I have been so busy with teaching and planning cooking classes that my own husband was eating frozen meals (at least they were homemade) and leftovers... 

Finally, I had a night with no class and enough energy to attempt one of my quick meals...comfort food at its best!

This is one of MacDaddy's favorites...and I'm sorry, I do not have a recipe...it's just a "by guess and by gosh" meal of boneless chicken breasts, mushrooms, garlic, fresh spinach and pasta. (How can you go wrong with these ingredients!) And it can be prepared in less than 30 minutes! I guess you could call it 

Chicken Florentine with Mushrooms

....Whatever you call it, it's DELICIOUS!

Ingredients for 2 servings:

     2 boneless, skinless chicken breasts, cut into thick slices...about 4 per breast
     5 cloves of garlic, peeled and sliced (more or less to taste!)
     Canadian Steak Seasoning* (I use this on EVERYTHING! I love the blend of peppers, garlic and other seasonings.)
     Olive oil
     Butter - about 3 tbsp. (I use Olivio)
     1 pound mushrooms, sliced (I use white or baby bella)
     1 bag fresh spinach
     Pasta - I used mini farfalle (usually use Orzo) I prefer Dreamfields...less carbs!
     Parmesan cheese, shredded
     Milk...or half and half (just a little!)

In a large skillet (I like to use my electric skillet for this), melt the butter and mix with the olive oil...medium heat. Season the chicken with Canadian Steak seasoning and add it to the pan. Add the sliced garlic. Saute' the chicken until done, making sure the all sides are deliciously browned. Remove the chicken from the pan. Add the mushrooms to the pan drippings, adding a little butter if needed (or a little chicken broth). When mushrooms are done, remove from the pan and add the spinach. Just wilt it until all the leaves are tender. Remove from heat. Add the chicken and mushrooms back into the pan to keep warm until plating.

While the chicken, etc. is cooking, prepare the pasta according to the directions on the package. Drain. Place the pasta back into the pot and add Parmesan cheese and a little milk/half and half...just enough to coat the pasta/cheese mixture. (This is a VERY LIGHT version of an Alfredo sauce.)

To plate...place a serving of pasta on a plate. Top it with spinach. Add the chicken, followed by mushrooms. 

*Canadian Steak Seasoning is the name used by Tone's. Weber, Badia, and McCormick have their own blends and names. They are basically the same)

Enjoy!

Friday, October 26, 2012

YUM YUM CINNA-BUNS!

DON'T THESE ROLLS LOOK DELICIOUS???


Would you believe they were made with just a few simple ingredients? And all the rising was done OVERNIGHT in the oven?

But first...and I believe foremost...it starts with the perfect baking pan...the Demarle at Home Large Round Flexipan.

Now I know I talk about the Demarle products a lot...but they have streamlined my cooking life. And that's something to SHOUT about!!!

You know how much I hate cleaning up after a meal...
Well, with this pan (even with sticky, gooey cinnamon rolls) clean-up took about a minute! Yep...that's right! The rolls popped right out and all it took to clean the pan was a little hot soapy water, a quick rinse and shake to dry...and voila'...IT'S CLEAN.
Talk about EASY!!!

OK...enough about my pan....

 These cinnamon rolls are super easy to prepare...and you use FROZEN BREAD DOUGH!
 Place about 16 frozen rolls in the bottom of your pan. (If you are using Demarle, you do not need to grease/oil/spray the pan. If you are using conventional bakeware, PREPARE YOUR PAN.)

Sprinkle the rolls with about 3/4 cup brown sugar. Sprinkle several good shakes of cinnamon on top. (I use a lot, because we LOVE cinnamon...plus it's really good for you. Gotta have something "healthy" in this dish!) Then pour 1/2 cup butter (melted) over the top of the rolls/sugar. If desired, sprinkle with pecans. (You can use walnuts, but, hey, I'm southern. We live on pecans!)

Place the round mold on a Demarle perforated baking tray (you can use a regular baking sheet, if you don't have the holey kind) and cover the rolls with plastic wrap OR with an octagonal Silpat.
Put in a cold oven, overnight.

In the morning, open your oven and remove the tray with the rolls. Preheat the oven to 350 degrees. Then remove the plastic wrap/Silpat.
When the oven is ready, place the tray with the rolls back into the oven and bake for about 30 minutes.
This is what you get!

Let the pan of rolls sit for a couple of minutes, then invert onto a serving plate.
The round Flexipan slides right off... (I don't know how easy the conventional pans will do. I don't use them anymore!)
This is the cleanup! All I need to do is wash the Flexipan in some hot, soapy water, and shake it to dry it. (This is MY kind of cleanup!!!)
All you need to do now is pour yourself a cup of coffee and enjoy...

For a variation...You can use butterscotch pudding (the cook and serve kind), 1/2 cup brown sugar and 1 stick of butter (melted)...This is more like the traditional Monkey Bread.
or
If you wish, melt the butter in a saucepan, add the brown sugar, cinnamon, and, if desired, a little white sugar to the pan. Stir until melted. Dip the frozen bread dough into the butter mixture (USE TONGS! This mixture is HOT!!!), then place in the baking pan. Pour the remaining butter mixture over the rolls, cover and follow the rest of the directions.

This afternoon we're testing this technique with MINCED GARLIC and BUTTER!!! 
I can already smell it.....Ahhhhhhhh.

Enjoy!
Jane

I am linking up with Foodie Friday