Pages

Showing posts with label foodie friday. Show all posts

Friday, October 11, 2013

PINTEREST PARTY???


Have you ever attended a "Pinterest Party"?

Abby and her friends have been hosting these parties for the past few months...and I finally had the opportunity to join in the fun.

What is a Pinterest Party, you say?  

Each hostess chooses a SIMPLE craft or (two, or three) from Pinterest. She gathers the needed materials and has them ready, with instructions, for all who attend. 

Each guest brings an appetizer, dessert, etc. made from recipes found on Pinterest....

Here's some of the foods brought to this Pinterest Party:


Cinnamon Wonton Crisps
(Cut each wonton wrapper in half and place on a Silpat/Perforated Baking Tray...or on a baking sheet lined with parchment paper.  Spritz each crisp with canola oil and top with cinnamon/sugar mixture. Bake for 6-7 minutes at 350 degrees. Place on a cooling rack. When cool, store in an airtight container. ***Watch the crisps when baking.They cook quite fast... Serve with fruit salsa.)

Fruit Salsa (my personal recipe) to go with the Cinnamon Wonton Crackers
(Mix diced and peeled apples, chopped strawberries and chopped bananas - or any combination of fruit - a little lime juice, a sprinkling of sugar or sweetner, and a couple of dashes of ground cinnamon. Refrigerate for at least 30 minutes, to allow the flavors to blend.)
Delicious Trifle

Chocolate Chip/Peanut Butter Cup Brownies (in a mini muffin pan)
Using a brownie mix, spoon batter into a mini muffin baking tray (I use the Demarle at Home mini muffin flexipan and the Perforated Baking Tray). Top with a miniature Reese's Peanut butter cup. Bake according to the directions on the mix box. The batter encloses the PBC for bites of deliciousness!

Strawberries dipped in White Chocolate, drizzled with blue 
Cheesy Artichoke Bread
Oh this was sooo good! (and I don't like artichoke!)
Wrapping Pool Noodles with torn denim jeans...Hot glue and persistence. 
(And a few burned fingers!)
Done! Now to add decorations...
Bow-making 101
Wrapping is "dangerous" work...that glue is HOT!

One of the finished wreaths...
We also made cool flip flops...gift card holders...rice candles...and more. Mostly, we laughed and ate and just enjoyed being together...

This is a fun evening to share with your girlfriends. 
Give it a try.....


Friday, June 14, 2013

WONTON WRAPS...a Love Affair

I don't know about you...but I am totally into WONTON WRAPPERS.


This little guys are so versatile...and they're LOW IN CALORIES!
I regularly use them in my cooking classes...they make the perfect "holder" for so many foods. Probably, the most popular appetizer I make with these little guys is my 
Mango Chutney/Cream Cheese Bites...a twist on the classic southern appetizer.

To make a really great "holder", I use a fluted cookie cutter to cut each wrapper. Then I place it in either a tartlette pan or a mini-muffin pan (I use the Flexipans by Demarle at Home.). These are baked for about 6 minutes at 350 degrees, then popped out of the pans and cooled. When cooled, I fill them, then top with a garnish of coconut, green onion or chives, and chopped peanuts. I often make the wontons a day or so ahead and store them in an airtight container until I am ready to use them.

Here are a few more dishes I have made with 
Wonton Wrappers...

Chili Lime Shrimp appetizers
(pinterest recipe...FABULOUS!)

Wonton cups with "Sheryl's Dip"
(Mix a little mayo with sharp cheddar, black olives and green onion. Sheryl puts it on Triscuit crackers. Yum!)

Parmesan Crisps/Crackers
(Cut each wonton in half. Place on a Silpat (or conventinal baking tray, lined with parchment paper). Brush a little olive oil on each wonton and sprinkle with sea salt, pepper (tiny bit!) and shredded Parmesan cheese. Bake for 6-7 min. at 350 degrees)

I also make these crisps using a little canola oil and cinnamon sugar. These goodies are wonderful when paired with a fruit salsa...or even by themselves.

Southwestern Egg Rolls
(The "rolls" are a Pinterest recipe. I liked it even better in the wonton cups (made in a Demarle Mini Muffin Flexipan or conventional mini muffin pan)! Great filling...and it makes a lot! Spicy!)

Give them a try...and please share YOUR recipes using Wonton Wrappers!!!

Happy cooking!
Jane


I am linking up with Foodie Friday...www.designsbygollum.blogspot.com


Friday, May 10, 2013

BLUEBERRIES! (and a recipe)

I have teen thinking about blueberries...

Yesterday, I found the first Florida blueberries in the store. They're still a bit pricey, but I just had to have them. There's no fruit I love more than blueberries!!! 


And then my sister called to say that her local blueberry farm is ready for picking...and the lady who makes the most fabulous fresh blueberry pies, made a quart of the filling for my sis...to use in little tarts for her party tonight. My mouth is watering, just thinking about these tarts....


So...off to Pinterest, I went...searching for recipes with blueberries. Some were new to me, and others are old friends. 


And then I remembered the most refreshing cake I ever made...and it had blueberries. This is one of the easiest cakes I have ever made, too!


Starting with a WHITE cake mix... using milk in place of the water (It makes a richer cake!) It's perfect for a Memorial Day dessert (or July 4th or Labor Day!). I call it the "Fruited Plains" cake. (I posted this a year or so ago, too...it's THAT tasty!)

"FRUITED PLAINS" CAKE

1 white cake mix
vegetable oil
eggs or egg whites (I used whole eggs)
milk
Heavy Cream
Powdered sugar (about 1/8 cup)
Strawberries
Blueberries

Prepare the cake mix according to the directions on the box, but substitute MILK for the water. Pour into two, greased and floured, 8 inch round pans. Bake according to the directions on the box. Cool in pan for 10 minutes, then invert onto cooling racks.
(I baked mine, for 35-40 minutes, in a large round Demarle at Home flexipan...no oils, sprays, butter, flour needed!)

When the cake is completely cool, place the first layer on a cake plate. Whip the heavy cream until peaks form. Fold in the powdered sugar. Spread whipped cream on the first layer. Top with sliced strawberries. Top this with the remaining layer of cake. Spread with whipped cream and tip with blueberries.(I cut the Demarle layer in half...spreading the cream between the layers). If desired, add a large dollop of whipped cream in the middle of the top layer, then gently press a large strawberry on top...maybe partially sliced and fanned out.

Place the cake in the refrigerator until ready to serve. It truly is much better when chilled.

Enjoy!
And happy Mother's Day to all you moms...

Jane


I am linking up with Foodie Friday...Check out all the delicious recipes this week...


Friday, October 26, 2012

YUM YUM CINNA-BUNS!

DON'T THESE ROLLS LOOK DELICIOUS???


Would you believe they were made with just a few simple ingredients? And all the rising was done OVERNIGHT in the oven?

But first...and I believe foremost...it starts with the perfect baking pan...the Demarle at Home Large Round Flexipan.

Now I know I talk about the Demarle products a lot...but they have streamlined my cooking life. And that's something to SHOUT about!!!

You know how much I hate cleaning up after a meal...
Well, with this pan (even with sticky, gooey cinnamon rolls) clean-up took about a minute! Yep...that's right! The rolls popped right out and all it took to clean the pan was a little hot soapy water, a quick rinse and shake to dry...and voila'...IT'S CLEAN.
Talk about EASY!!!

OK...enough about my pan....

 These cinnamon rolls are super easy to prepare...and you use FROZEN BREAD DOUGH!
 Place about 16 frozen rolls in the bottom of your pan. (If you are using Demarle, you do not need to grease/oil/spray the pan. If you are using conventional bakeware, PREPARE YOUR PAN.)

Sprinkle the rolls with about 3/4 cup brown sugar. Sprinkle several good shakes of cinnamon on top. (I use a lot, because we LOVE cinnamon...plus it's really good for you. Gotta have something "healthy" in this dish!) Then pour 1/2 cup butter (melted) over the top of the rolls/sugar. If desired, sprinkle with pecans. (You can use walnuts, but, hey, I'm southern. We live on pecans!)

Place the round mold on a Demarle perforated baking tray (you can use a regular baking sheet, if you don't have the holey kind) and cover the rolls with plastic wrap OR with an octagonal Silpat.
Put in a cold oven, overnight.

In the morning, open your oven and remove the tray with the rolls. Preheat the oven to 350 degrees. Then remove the plastic wrap/Silpat.
When the oven is ready, place the tray with the rolls back into the oven and bake for about 30 minutes.
This is what you get!

Let the pan of rolls sit for a couple of minutes, then invert onto a serving plate.
The round Flexipan slides right off... (I don't know how easy the conventional pans will do. I don't use them anymore!)
This is the cleanup! All I need to do is wash the Flexipan in some hot, soapy water, and shake it to dry it. (This is MY kind of cleanup!!!)
All you need to do now is pour yourself a cup of coffee and enjoy...

For a variation...You can use butterscotch pudding (the cook and serve kind), 1/2 cup brown sugar and 1 stick of butter (melted)...This is more like the traditional Monkey Bread.
or
If you wish, melt the butter in a saucepan, add the brown sugar, cinnamon, and, if desired, a little white sugar to the pan. Stir until melted. Dip the frozen bread dough into the butter mixture (USE TONGS! This mixture is HOT!!!), then place in the baking pan. Pour the remaining butter mixture over the rolls, cover and follow the rest of the directions.

This afternoon we're testing this technique with MINCED GARLIC and BUTTER!!! 
I can already smell it.....Ahhhhhhhh.

Enjoy!
Jane

I am linking up with Foodie Friday


Saturday, September 8, 2012

CHICKEN ROULADES

Chicken Roulades...my new favorite dish to make. Why? 
Because it is so quick and easy ...and it's much more economical to prepare, than to purchase them at the meat market.

You know...I had not even thought of that until last night when one of my customers mentioned that she had just purchased 4 roulades for her family...and spent $20 on just the chicken dish! At our party, we made these tomato/spinach/Parmesan cheese stuffed roulades for under $10...and still had chicken left to make an appetizer!

The beauty of Chicken Roulades is that you can stuff them with just about anything. Chicken Cordon Bleu is a "roulade"...my Publix has these and other varieties available in the butcher shop. Other meat markets have them stuffed with crabmeat...cheddar cheese...even sausage! There are so many ways to prepare them...

The recipe for my version came from a fitness trainer...as part of the "HEALTHY COOKING" class we held last week. The original recipe required browning the roulades in a pan on the stove. But, I tweaked the recipe a bit, to use on my Demarle at Home Silpat...and to make the dish even easier! A quick dip in egg whites, mixed with a little chicken broth, then a roll in Italian Seasoned Bread Crumbs, and the roulades were ready to BAKE! You can bake these in traditional pans, but you will need to turn them during baking. But when using the Silpat and the Perforated Baking Tray, the roulades cook on both sides...in about 25 minutes! No turning....and best of all, cleanup takes just seconds with just a quick soap and water wash. 

These roulades were delicious, both hot and cold. They would also make a nice heavy appetizer...


For the "Healthy Cooking Class", we served the Roulades with red peppers stuffed with quinoa and vegetables, a shrimp/mango appetizer, Portobello Mushroom "Pizza", and Fresh Blueberry/Peach Crisp. Every recipe was approved by the fitness trainer...and all the dishes were DELICOUS and HEALTHY...and they're 
EVERYDAY EASY!

Enjoy! 

CHICKEN ROULADES
     with Tomato, Spinach and Parmesan Cheese


Boneless chicken breast (I used a cutlet...on sale), pounded THIN. Take the thin chicken breast...place a thin slice of fresh tomato on the breast. Add several leaves of fresh baby spinach. Sprinkle with a little shredded Parmesan cheese. Roll as tightly as you can. Fasten with toothpicks.  Dip the chicken roulade in a dish of beaten egg (or egg white) and a couple of tablespoons of chicken broth, mixed together. (Basically, you will "roll" the roulade in this mixture). Roll the roulade in Italian seasoned bread crumbs. (Light!) Place on Silpat/tray and bake at 375 for about 25 minutes (more or less, depending on the thickness of the chicken and the oven). Remove from Silpat and slice. (This is really a pretty presentation...white meat with red and green swirl)

If desired, you can make a sauce to pour over chicken...chicken broth, diced tomatoes, chopped spinach, a splash of white wine (actually calls for red wine vinegar...I think the wine would be better)and a little seasoning, such as garlic, onion, salt and pepper. Simmer while the chicken is baking...reducing the liquid. Spoon over the roulades. Sprinkle the top with a little chopped fresh basil.


I am connecting this Foodie Friday this week...check out all the fab recipes!

Thursday, August 16, 2012

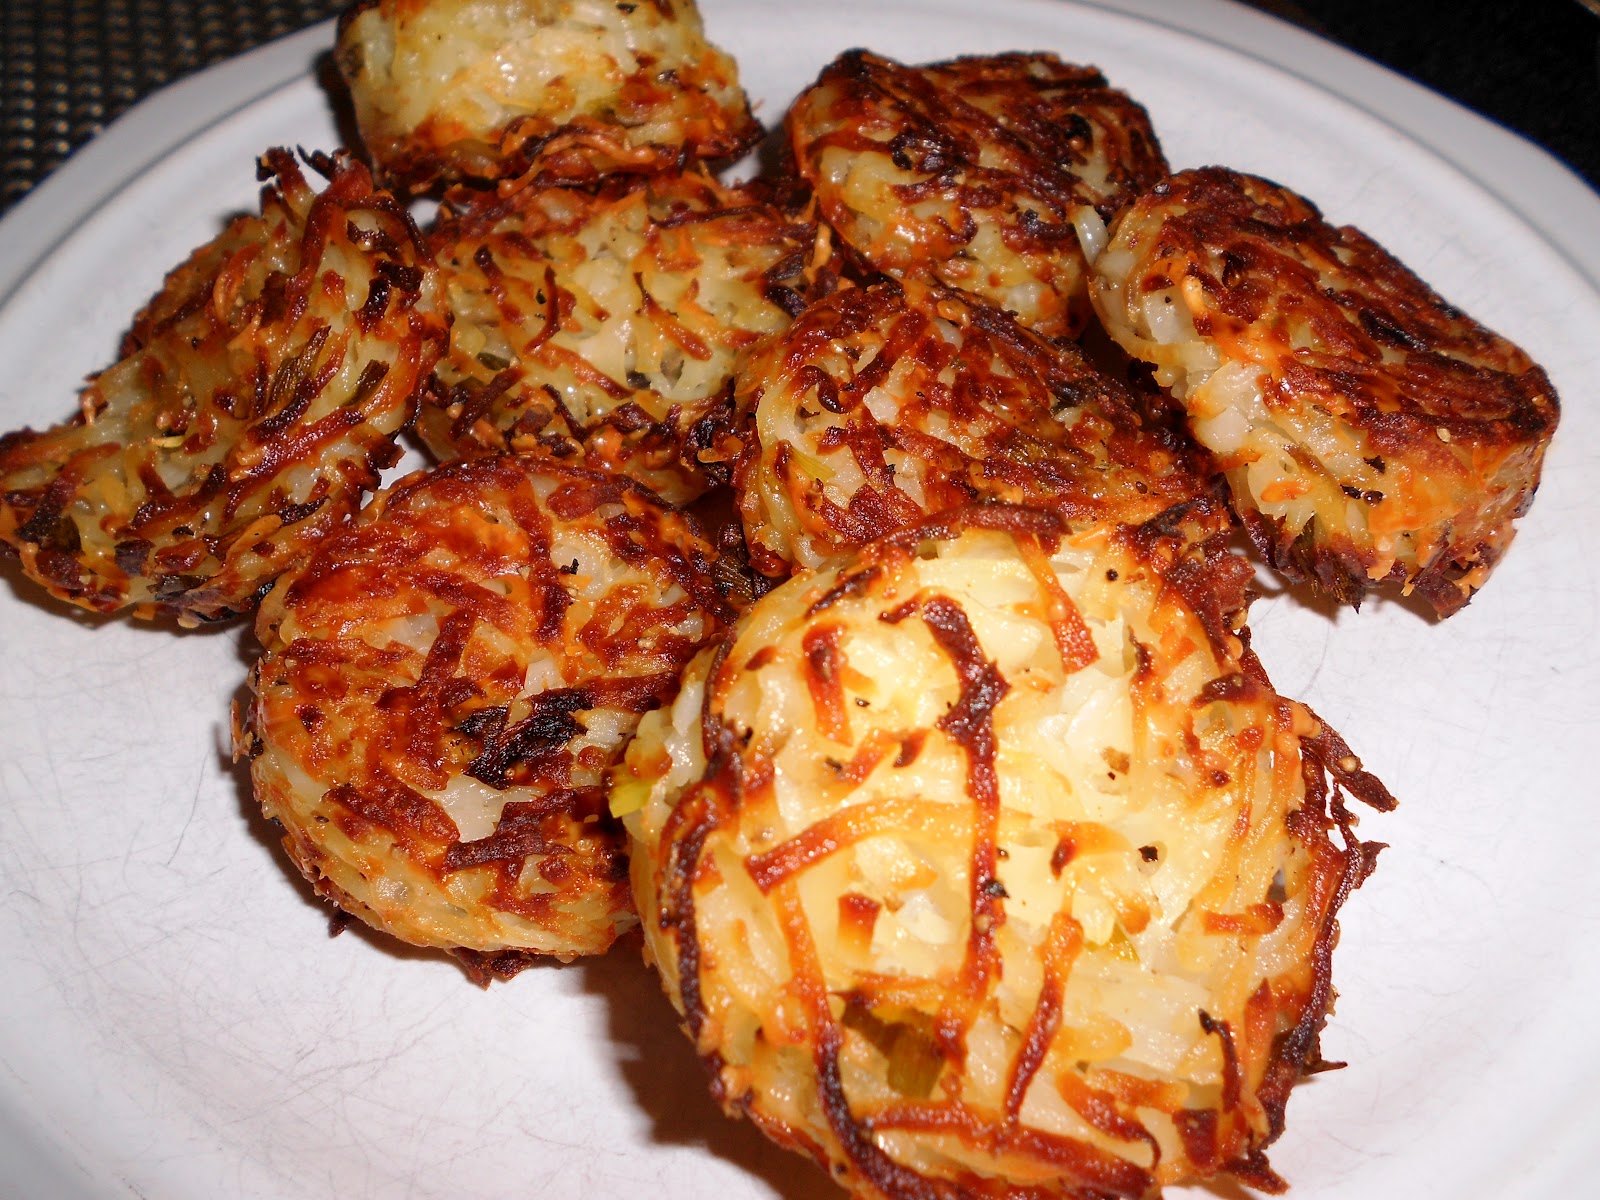
PARMESAN HASH BROWNS and BUTTERMILK BLUEBERRY BREAKFAST CAKE

Yesterday, I posted photos (on Facebook) of two more delicious dishes I made in my Demarle at Home FLEXIPANS...and I have had requests for these recipes over and over again... Since it's easier to share the recipes through my blog... here goes!


Parmesan Hash Brown Cups
By Monica  http://www.theyummylife.com            Servings: makes 12
(The original recipe has been modified to use in Demarle at Home Flexipans)
Ingredients
·         1 (20 oz) bag Simply Potatoes Shredded Hash Browns; OR 3-1/2 cups shredded russet potatoes, rinsed and squeezed dry in a towel
·         3 green onions, chopped (approx. 1/3 cup), both white and green parts (I used 2)
·         1/2 cup grated Parmesan cheese
·         1 teaspoon kosher salt
·         1/2 teaspoon black pepper
·         2 tablespoon olive oil
Directions
Preheat oven to 350 degrees. Place the Muffin Flexipan on the medium perforated baking sheet and set aside. In large bowl, combine potatoes, onions, cheese, salt, and pepper. Toss lightly with a fork. Drizzle on olive oil. Toss with fork again until mixture is well combined. Spoon mixture evenly into 12 muffin cups. With the back of the spoon, apply gentle pressure to pack mixture into each cup. Bake for 60-75 minutes in lower third of oven. Let rest for 5 minutes. The potato cups should pop right out of the flexipan, but if needed, gently press the bottom of the muffin flexipan to release each potato cup out and place on serving plate. (The recipe suggests inverting the potato cup, serving it bottom side up, but there was no difference in the top or bottom. Both were perfectly browned . Good served warm or room temperature.

MAKE AHEAD FOR COOKING LATER: Combine mixture, spoon it into muffin flexipan, cover with plastic wrap, and refrigerate until ready to bake. Remove from fridge 30 minutes before baking time. May be made the night before to cook and serve for breakfast the next day.

MAKE AND COOK AHEAD FOR REHEATING LATER: These are best when eaten freshly baked. However, they can be baked ahead of time, refrigerated or frozen, and reheated before serving. They lose some of their crispiness when reheated, but the texture and taste is still good.

FOR BITE-SIZE TATER TOTS - make them in mini muffin pans.
 

SERVING SIZE = 1-2 hash brown cups per person


BUTTERMILK BLUEBERRY BREAKFAST CAKE


(MacDaddy REALLY loved this! Light texture, full of fresh blueberries, and not too sweet!)

Buttermilk Blueberry Breakfast Cake
Recipe modified to use in a Demarle at Home Flexipan

Serves 6-8
½ cup unsalted butter, room temperature

2 tsp. lemon zest or more — zest from 1 large lemon

7/8 cup* 

1 egg, room temperature
1 tsp. vanilla
2 cups flour
2 tsp. baking powder
1 tsp. kosher salt
2 cups fresh blueberries
½ cup buttermilk


2 Tbsp. sugar for sprinkling on top of cake

* 7/8 cup = 3/4 cup + 2 tablespoons


1. Preheat the oven to 350ºF. Cream butter with lemon zest and 7/8 cup of the sugar until light and fluffy.

2. Add the egg and vanilla and beat until combined. Meanwhile, toss the blueberries with ¼ cup of flour, then whisk together the remaining flour, baking powder and salt.

3. Add the flour mixture to the batter a little at a time, alternating with the buttermilk. Fold in the blueberries.

4. Place a Demarle at Home Flexi-pan on the Medium Perforated Baking Sheet. DO NOT USE OIL, BUTTER, NON-STICK SPRAY!!! Spread batter into pan.  Bake for 35 minutes. Check with a toothpick for doneness. If necessary, return pan to oven for a couple of more minutes. (Note: Baking for as long as 10 minutes more might be necessary.) Let cool at least 15 minutes before unmolding the cake onto a serving plate. Sprinkle the cake with the remaining sugar.

***I found both of these recipes on Pinterest and modified them to use in Demarle at Home Flexipans...Both dishes come out cleanly from the molds/pans. Cleanup is just a quick soap and water wash. These Flexis make cooking healthier and EVERYDAY EASY!!! If you would like to know more about these pans, please email me.

Enjoy!
Jane

I am linking up with Foodie Friday!

Thursday, March 8, 2012

A SHARED CUP OF COFFEE...or TEA

This morning, I read an interesting question...


    "If you could share a cup of coffee with any woman in the world, who would it be?"


The answers were quite interesting... Most said they would love to share a cup of coffee with their mother or a special friend.

As I pondered this question, I had a similar answer...
I would love to share coffee with a friend. 

Sharing coffee time or tea time with friends has been a huge part of my life. These special friends have lived through each and every stage of life with me...

 This was especially true when I lived in Pennsylvania, Tennessee, Arkansas, and Texas. At least one day a week, I met with a friend...at her house or mine...and shared a warm cup of friendship. This was a time of sharing...of dreaming...of encouragement...a break from the rigors of a job and motherhood.
 And it was a time of hospitality!

My friend, Josephine, taught me a lot about sharing tea...and time...with a friend. She was married to a Brit and learned the importance of taking time out of her day to spend with a friend and a cuppa. In the spring, we often set a table under the blooming lilacs, using lovely linens and china. She always made me feel special. It didn't matter if the cookies were store bought...or if we nibbled on PBandJ sandwiches (cut into triangles and without crusts, of course). It was all about friendship.

My neighbor, Betty, and I would just pop into each others' kitchens whenever we needed a moment...coffee was always ready. And in the summertime, there was always a pitcher of iced tea. She is the friend who got me through the early stages of motherhood...and she was my "family" in that far off land of UP NORTH. We laughed...we cried...we SHARED life! 

Ann's kids and my boys were the same age, so we shared many a cup of coffee while watching the kids play...or while they were in preschool. We talked about our dreams...for our kids, our husbands, and ourselves. She also helped me live through my last pregnancy with lots of joy and laughter.

Muffy and Louisa were there to encourage me when I began home-schooling my boys. They were always ready with tea and tissues. These women taught me so much...They encouraged me in my Christian walk...in motherhood...in being a wife...through devastating circumstances...They were always there, no matter what time it was. They were...and still are the sisters of my heart.

For the past few years, I sadly have not continued spending time over coffee with my friends. Maybe it's my new stage of life...grown kids, work, or just being comfortable with myself... I definitely MISS it! I guess time just slips away, along with my good intentions.
Well....that's going to STOP.RIGHT.NOW! I'm going to stop and smell the coffee...and invite my girlfriends to join me.

We women NEED to have these coffee times...these woman-to-woman connections. It's part of our DNA (not literally, but it sounds good).
Pick up that phone and invite a special friend over for coffee or tea next week. Start a new tradition!
Ask yourself...

  "If you could share a cup of coffee with any woman in the world, who would it be?"


Recipes for my favorite...Cafe con Leche

1/3 cup fresh ground coffee, such as a French Roast ( or Cuban coffee, if you can get it)
1 cup boiling water
1 cup whole or 2% milk

1.  Place coffee in bottom of a prewarmed French press. Add boiling water, replace lid (without lowering the filter) and allow to brew for 5 minutes.
2.  While coffee is brewing, place milk in a small saucepan. Bring just to the boiling point, then reduce to barely simmering. Simmer gently for a few minutes, stirring occasionally, until the coffee is done.
3.  After the 5 minutes are up, depress the plunger on the press to strain the grounds. Divide coffee into 2-4 cups (depending on the size of your cup) Add hot milk to each cup...a ratio of 1/2 mug/cup coffee, 1/2 mug/coffee milk
4. If desired, sweeten to taste (I prefer my without sugar)

*You can also make this with Fresh Brewed Coffee from your coffee maker...again, a dark roast is preferable. And you can heat your milk in the microwave, then pour your coffee over the milk.
I do this in a "venti" Starbucks mug...half milk, half coffee.

For a REALLY QUICK CAFE'...
     Heat 2 cups milk...on stove or in the microwave. Do not bring to a boil. Add 2 tsp. instant coffee (or more, if desired), preferably a dark roasted instant coffee, and stir. Sweeten to taste.

***I like to froth my milk a little, using a hand-held frother. 

AND...for a REALLY, REALLY QUICK CAFE'....order a "Misto" at Starbucks. It's pretty close!


Jane

Visit Foodie Friday for some wonderful "goodies" to go along with your Cafe'


Thursday, February 23, 2012

ARIZONA CHOCOLATE CHIP COOKIES!


Several years ago, one of my Texas neighbors sent a basket of warm cookies to our house, as a thank you. During these years, I had a house filled with 3 young boys and a husband...all lovers of anything cookie. But, they were not the kind of cookie monsters who would eat a LOT at one sitting. Two at a time was the norm. Until these cookies arrived...
These are my boys when we lived in TX...
I have never seen my men eat like that! The 2 dozen cookies were gone in minutes...and the boys were out the door, heading to the neighbor's house, to ask for the recipe so I could make them again. Yes, they were THAT good!


I have no idea why these delectable cookies are named for the state of Arizona. Nor could my friend tell me. All I know is that they are absolutely delicious!


Here's the recipe.....Hope you enjoy them as much as my family... 


RECIPE:
Sift together:
2 cups all purpose flour
1/2 tsp. baking powder
1 tsp. baking soda
pinch salt


Cream together:
1 cup sugar
1 cup brown sugar
2 eggs
1 tsp. vanilla extract
1 cup butter


Add the flour mixture to the butter/sugar mixture.


Add:  2 cups oatmeal (I prefer the Old-Fashioned oats)
         2 cups shredded coconut
         1 cup chocolate chips
         1 cup chopped pecans


Drop dough (tablespoon) onto a prepared or parchment-lined baking sheet...2 inches apart. Bake at 350 degrees F until brown (approx. 12-15 minutes).


Makes a lot!!! (and I usually cut out some of the sugars)
***I lightly tap the hot cookies with a spatula, to flatten them a little.  And I used a teaspoon to drop the photographed cookies...I wanted them to be a bit smaller, so I would not feel too guilty eating a couple. (And yes, I went for a walk afterwards.)


Enjoy!


Visit Foodie Friday for more wonderful recipes!

Friday, September 30, 2011

FRITTATAs

You know, it always amazes me how blogging opens doors for wonderful friendships...not only in written word, but in REAL LIFE. And it's really wonderful when the husbands/wives can share in the fun...


While in St. Augustine, MacDaddy and I had the wonderful privilege to share a meal with my dear friend, Mrs. Magpie (Sheila from Quintessential Magpie) and her husband. We met them at La Pentola...an absolutely wonderful restaurant in Old Town....for Sunday brunch. The menu was a mixture of Latin and Mediterranean cuisine...


As usual, I did not bring my camera with me, so no photos of the meal and the diners...

(restaurant photos courtesy of La Pentola website)


My meal was a chorizo frittata... one of the "comfort foods" from my childhood. Several times a week, my mother would make frittatas for lunch. Of course, she did not use the "special" ingredients used by the chef at La Pentola. She used the refrigerator...and all the leftovers from dinner the night before.


All those little bits of meats and veggies, plus a little sliced potato and onion, were sauteed in a pan with a little olive oil. Beaten eggs were added and the frittata was born.... It was always delicious (except when she added green peas. I didn't like them!)


Since we returned from our trip, I have been making frittatas for my lunch/brunch at least once a week. They're quick, easy, and oh, so good.  Here's how (and you DON'T need a "frittata pan"!)

BASIC FRITTATA
Ingredients***:
   1. a few pieces of thinly sliced potato
   2. a little chopped sweet onion
   3. 2-3 thin slices of deli ham, chopped
   4. salt and pepper to taste


In a small, slope-sided pan, saute the potato and onion in a little olive oil. (I find covering the pan for a couple of minutes helps the potato to thoroughly cook). Add the ham and saute until it's lightly browned on the edges. In a bowl, scramble 2-3 eggs, then pour over the ham mixture. Gently lift the edges to allow the wet egg to get to the bottom of the pan. When the egg is set, gently slide the frittata onto a plate, and flip it over, back into the pan. At this point, I cover it for a minute, to make sure it's thoroughly cooked. Slide it onto your serving plate...and enjoy.


***You can use any combination of meats, vegetables, cheeses...whatever you like. It makes a wonderful light lunch or dinner...even breakfast. (I especially love a combination of chorizo (a Spanish sausage) and diced avocado. I serve this with a little salsa and a dollop of sour cream.)


Enjoy!
Jane


Check out all the wonderful recipes at FOODIE FRIDAY!